In the previous post we discussed about our decision to migrate to a React front-end. This post describes the specifics of how React was integrated in our WebViewer application. For a more generic description of integrating React in a Visual Studio application check out the relevant post on medium.
Having decided on using React and embedding React components onto WebForms pages, the next major decision concerned the location to store the front-end code:
- As part of a separate project in our Visual Studio solution.
- Inside a directory within the WebForms application solution.
One of the top items on our wish-list from the resulting setup was to be able to use lightweight, highly productive front-end development tools such as the webpack-dev-server with Hot Module Replacement (HMR) and Visual Studio Code (or some other text editor for that matter). This way, developing the front-end could be done separately from the back-end (and even completely outside the Visual Studio IDE) as long as the back-end was running in the background and remained unchanged. The webpack-dev-server with HMR provides the really neat feature of automatically building the front-end application and reloading the browser whenever changes to the source files are made.
The above requirement proved to be a pivotal factor in deciding the location for the front-end files. Serving the front-end of the application with webpack-dev-server would require us to include, additionally to the front-end bundle, styles and scripts needed by the entire application. Indeed, hosting the front-end code in a separate project would complicate the way those additional scripts were included and, on top of that, would necessitate configuring the build pipeline to copy the produced bundles from the front-end project to the main application. The details of how to setup webpack-dev-server in order to isolate the front-end and back-end development in a WebForms application will be provided in the following paragraphs.
Concluding the deliberation laid out so far, we decided to host the front-end files in a “React” directory at the top level of our WebForms project. The next step was to scaffold a new React application inside that directory. Setting up a new React application can be done in a number of ways (some much simpler than others). As it is usually the case, the more complex the setup, the greater the flexibility it provides and, in our not-so-standard scenario, we needed all the flexibility we could get. Thus, we opted for creating a toolchain from scratch using npm, webpack and Babel, using this link as a starting point. Our intention was for the resulting build process to meet the following requirements:
- Support ES6.
- Support JSX.
- Allow multiple application entry points.
- Allow development and production build configurations.
- Trigger the build process as a build event of the WebForms project.
- Allow isolated front-end development.
- Allow fine browser compatibility control.
The resulting setup is shown in the below figure.
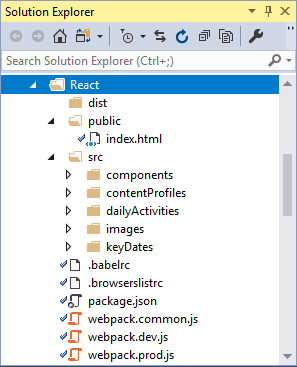
And the following files:
- webpack.common.js: The webpack configuration that is common for the production and development builds. Includes configuration for the entry points (one for each page), the loaders, the resolution, the output and the devServer. The devServer must be setup to send a number of HTTP headers in order to allow CORS from the browser (the back-end will be served from a different URL than the front-end so CORS is needed).
As each entry point produces a separate bundle, it is possible that some bundles share code (e.g. modules imported from the components directory). Webpack allows for optimizing this scenario by extracting common code to separate bundles in order for these bundles to be separately included on the page. Thus, common bundles are downloaded only the first time a page that uses them is visited. The production bundles in our scenario turned out to be ~700KB, so we decided not to pursue this solution due to the extra complications of having to import multiple files on each page. Nevertheless, it is a really neat feature, so you are encouraged to seek more information about it here (https://webpack.js.org/plugins/split-chunks-plugin/).
- webpack.dev.js: The webpack configuration that is specific to the development build. It dictates the creation of source maps.
- webpack.prod.js: The webpack configuration that is specific to the production build. It dictates the minification of the bundles.
- package.json: The npm packages configuration, including script shortcuts for starting the webpack-dev-server, building the development version and building the production version.
- .babelrc: The Babel configuration enabling browser compatibility (@babel/preset-env) and React transpilation (@babel/preset-react) presets.
- .browserslistrc: The list of supported web browsers to be used by the browser compatibility transpilation module above.
The proposed setup is characterized by the following main points:
- The webpack.common.js defines one entry point for each WebForms page on which we need to host a React front-end. Essentially, we have one React application for each page.
- Building of the front-end code can be done in the following ways:
- Manually through npm: Run the command “npm run build-dev” or “npm run build-prod” on the command line inside the React directory for the development or production version respectively.
- Automatically when some files change: Set up the webpack-dev-server HotModuleReplacementPlugin so that the solution is automatically rebuilt and the page in the browser reloaded when changes to the source files are made.
- Automatically during solution build: Set up the Pre-build event command line to run the “npm run build-dev” or “npm run build-prod” for the Debug and Release configuration respectively. The code to set this up is:
cd "$(ProjectDir)React"
if $(ConfigurationName) == Debug (
  call npm run build-dev
)
if $(ConfigurationName) == Release (
  call npm run build-prod
)- Provided that the back-end is running (via IIS or IIS Express) front-end debugging with hot component reloading can be started by running “npm run start”. In order for webpack-dev-server to accept the changes and reload the page the top-most components of each React application (i.e. page) must be exported using the react-hot-loader module.
- The deployment package includes only the files under the React\dist directory. This may be done by adding a <project_name>.wpp.targets file at the top level of the WebForms project with the following contents:
<Project ToolsVersion="4.0"
         xmlns="http://schemas.microsoft.com/developer/msbuild/2003">
  <ItemGroup>
    <ExcludeFromPackageFolders Include="React\">
      <FromTarget>ScheduleProWebViewer.wpp.targets</FromTarget>
    </ExcludeFromPackageFolders>
  </ItemGroup>
  <PropertyGroup>
    <CopyAllFilesToSingleFolderForPackageDependsOn>
      CustomCollectFiles;
      $(CopyAllFilesToSingleFolderForPackageDependsOn);
    </CopyAllFilesToSingleFolderForPackageDependsOn>
    <CopyAllFilesToSingleFolderForMsdeployDependsOn>
      CustomCollectFiles;
      $(CopyAllFilesToSingleFolderForMsdeployDependsOn);
    </CopyAllFilesToSingleFolderForMsdeployDependsOn>
  </PropertyGroup>
  <Target Name="CustomCollectFiles">
    <ItemGroup>
      <_CustomFiles Include="React\dist\*" />
      <FilesForPackagingFromProject Include="%(_CustomFiles.Identity)">
        <DestinationRelativePath>React\dist\%(Filename)%(Extension)
 </DestinationRelativePath>
      </FilesForPackagingFromProject>
    </ItemGroup>
  </Target>
</Project>
The next post describes how we architected the React components for use with our WebViewer application.